


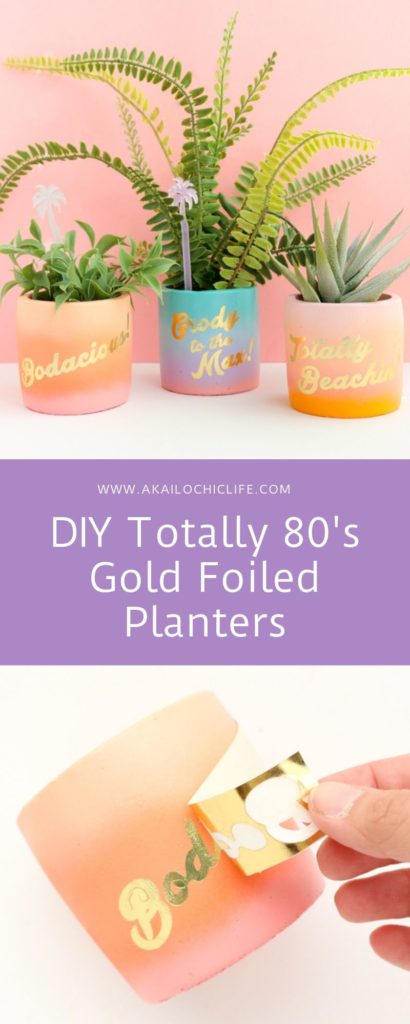
Ever since using tattoo paper to make patterned planters, I’ve been dying to try using gold foil tattoos. But I didn’t want those flash tattoo looks. I wanted to be able to create my own custom typography tattoos to use. That’s when I found out about Silhouette’s gold foil tattoo paper. It can be cut in your cutting machine to create custom designs! I was a little intimidated to cut and use the tattoo paper, but it was actually crazy simple. And the gold foil typography on these DIY totally 80’s gold foiled planters is better than any adhesive vinyl. The tattoo paper is also more pliable, which means that the design can easily wrap around a curved surface like these planters.

I used a few of my gradient planters for the base because they totally lent to the 80’s beach vibes I was going for, but you can use this same technique on any ceramic or concrete planter.
Materials for DIY Totally 80’s Gold Foiled Planters:
–Gold Foil Tattoo Paper
-Vinyl cutting machine (I used my Cricut Maker, but any cutting machine should work)
–Planter
-Wet Sponge
–Mod Podge
–Foam brush
-Your own typography png file, or this one with my totally 80’s sayings

Cutting the Words
Begin by uploading your typography file to your cutting design program. For Cricut I uploaded the file and then went through the steps to create a cut file from the png file. Once in the design space, I vertically mirrored the words (this is key so that the words are the correct direction when the tattoo is applied). Then I used the cut feature to cut out the words from the gold tattoo paper. When you are cutting your designs, you want to cut through the top plastic layer, but leave the paper backing uncut.
Once your design is cut out, use a pair of scissors to remove your designs from the sheet and use pliers to remove the plastic sheeting that is covering the letters only. This exposes the gold tatoo foil underneath but keep the negative space covered with plastic so that it doesn’t transfer.

Applying the Tattoo Paper
Once the plastic has been peeled away (remember only peel away the plastic over the words and not the negative space or the pieces in between the letters like the cutouts of the B or o, etc.), lay your tattoo paper over the planter. Use a sponge to damped the paper backing and hold in place with light pressure for 20-30 seconds. Then peel back the paper backing to reveal your tattooed planter.


As you can see above, the negative space in the B and O released from the paper backing, but since it still had the plastic on it, it didn’t stick to the planter and I was able to easily remove the pieces with a pair of pliers.

Sealing the DIY Totally 80’s Gold Foiled Planters
Once the typography has been transferred, give the text a light coating of mod podge. This will keep it sealed and prevent it from rubbing off. When the mod podge has dried, the DIY totally 80’s gold foiled planters are ready for your plants.


I am so obsessed with how they turned out! Who knew tattoo paper could look so good?!
P.S. If you don’t have a vinyl cutter, you can always use already existing flash tattoos to decorate a planter. Or try cutting out designs from a piece of tattoo paper with scissors to create a geometric or abstract pattern instead.


