


This post, DIY Give Thanks Color Blocked Wall Art, is sponsored by Krylon® Brand. All ideas and opinions are my own. Thank you for supporting the brands that keep the crafts coming!


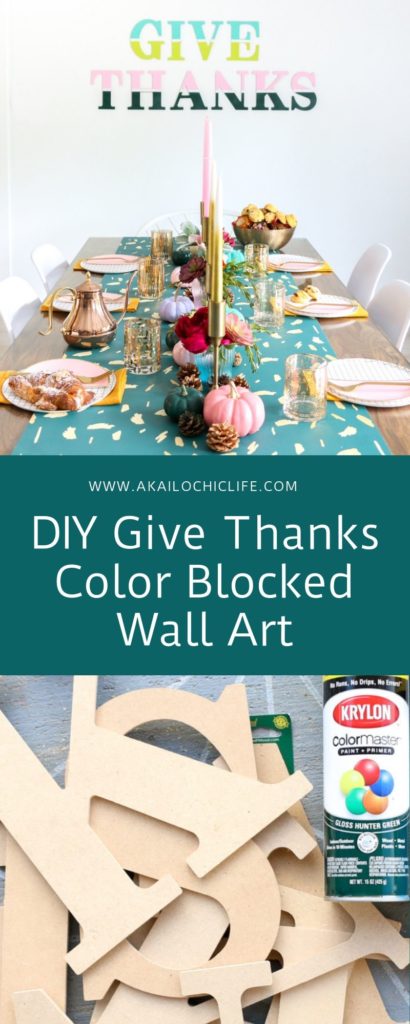
Friendsgiving is all about the food and gathering with friends to share all the things you are thankful for. Therefore, why not display the reason for the season with a large DIY “Give Thanks” color blocked wall art piece? This large typography piece is made from MDF craft letters and 4 gorgeous colors of Krylon® Brand spray paint. I love to use spray paint for quick and simple projects. I feel that they really bring the wow factor. And it is so easy to use! These unexpected colors paired with a simple color block look certainly makes this Friendsgiving dinner far from traditional. Just the way I like it!


You may be asking where I came up with this color palette. Well, would you believe that it came from a matchbook? This striped matchbook had shades of blue, green, and pink. I loved the unexpected way the colors all worked together. To me, it felt like the perfect friendsgiving dinner color palette. Luckily, Krylon® Brand had the perfect shades to match the matches!
Make Time: about 2 hours (not including final overnight drying)
Materials for DIY Give Thanks Color Blocked Wall Art:
– MDF Craft letters raw or primed white
– Hunter Green (Gloss) can of Krylon® ColorMaster Paint + Primer – 25% More
-Ballet Slipper (Gloss) can of Krylon® ColorMaster Paint + Primer – 25% More
-Citrus Green (Gloss) can of Krylon® ColorMaster Paint + Primer – 25% More
-Sea Glass (Satin) can of Krylon® ColorMaster Paint + Primer – 25% More
– Gum Drop (Gloss) can of Krylon® ColorMaster Paint + Primer – 25% More (optional for colored pumpkins)
– White (Satin) can of Krylon® ColorMaster Paint + Primer – 25% More (optional if using raw letters and you want a white stripe)
– Washi tape or painter’s tape
Instructions

Before beginning to spray paint, make sure to read the label for safety and application instructions. Additionally, for you spray paint newbies, it’s important to spray outdoors or in a well-ventilated area!
First, lay out your letters on a piece of cardboard or painting tarp outside. Next, spray a white stripe down the center of each letter. There is no need to be precise. This step is optional. It is only needed if you are using raw unprimed MDF letters and want a white stripe between the colors. You can skip this step otherwise.
Then, once your white paint has fully dried, place a piece of washi tape or painter’s tape down the center of the letters. I found that it was easiest to line up the letters and then place one long strip of tape across all the letters to make sure that the strip was even down the center of them all.

Next, I began with the lighter of the two colors for each word and spray painted the top portion of the letters. At this point, I didn’t mind a bit of overspray. Then, let the paint dry for 15 minutes before coming back to give them a second coat. For the light colors you may need to wait another 15 minutes and do a third coat.

After the first color was applied and dry, I held a piece of cardboard on the tape line and spray painted the bottom color. The cardboard piece helped keep the second color from overspraying onto the first. As you can see above, I didn’t do this for the first coat of the Krylon® ColorMaster Paint + Primer – 25% more in Hunter Green, but luckily it’s easy to correct with another coat of Krylon® ColorMaster Paint + Primer – 25% More in Ballet Slipper pink. Once all the coats of paint were on the letters and the color was solid with no translucent spots, I peeled away the tape when the paint was dry to the touch and let the letters sit outside overnight to fully dry.

The final step was mounting them on the wall. I simply used removable wall mounting strips to stick the letter to the wall to read out Give Thanks over the dining table.
The Results
After that, I completed the unique Friendsgiving color palette in the runner (it’s sticky wallpaper!), napkins, and pumpkins and pinecone center pieces. I used the leftover Krylon® ColorMaster Paint + Primer – 25% More in Gloss Hunter Green, Gloss Ballet Slipper, Gloss Gum Drop, and Satin Sea Glass these pumpkins and pinecones so I could assure that the colors on the table perfectly matched the wall art.


Perhaps most importantly, this whole project only took one day including drying time, so it’s an easy last minute project to really pull your Friendsgiving celebration together. In addition, if this non-traditional color palette isn’t your jam, Krylon has your back! Be sure to check out all the other Krylon ColorMaster Paint + Primer – 25% More colors. Certainly, there will be a few that are just right for you!
This photo shoot took place at the Travis Heights Treasure here in Austin. You can see more about the property and book a stay the next time you are in town here. The place is beautiful!


December 6th, 2018 at 1:36 am
I am obsessed! Where is the sticky wallpaper from?
December 12th, 2018 at 5:40 pm
I got it from SpoonFlower
November 20th, 2020 at 4:22 pm
[…] Friendsgiving Decorations and Decor | Picture Perfect Backdrops […]