


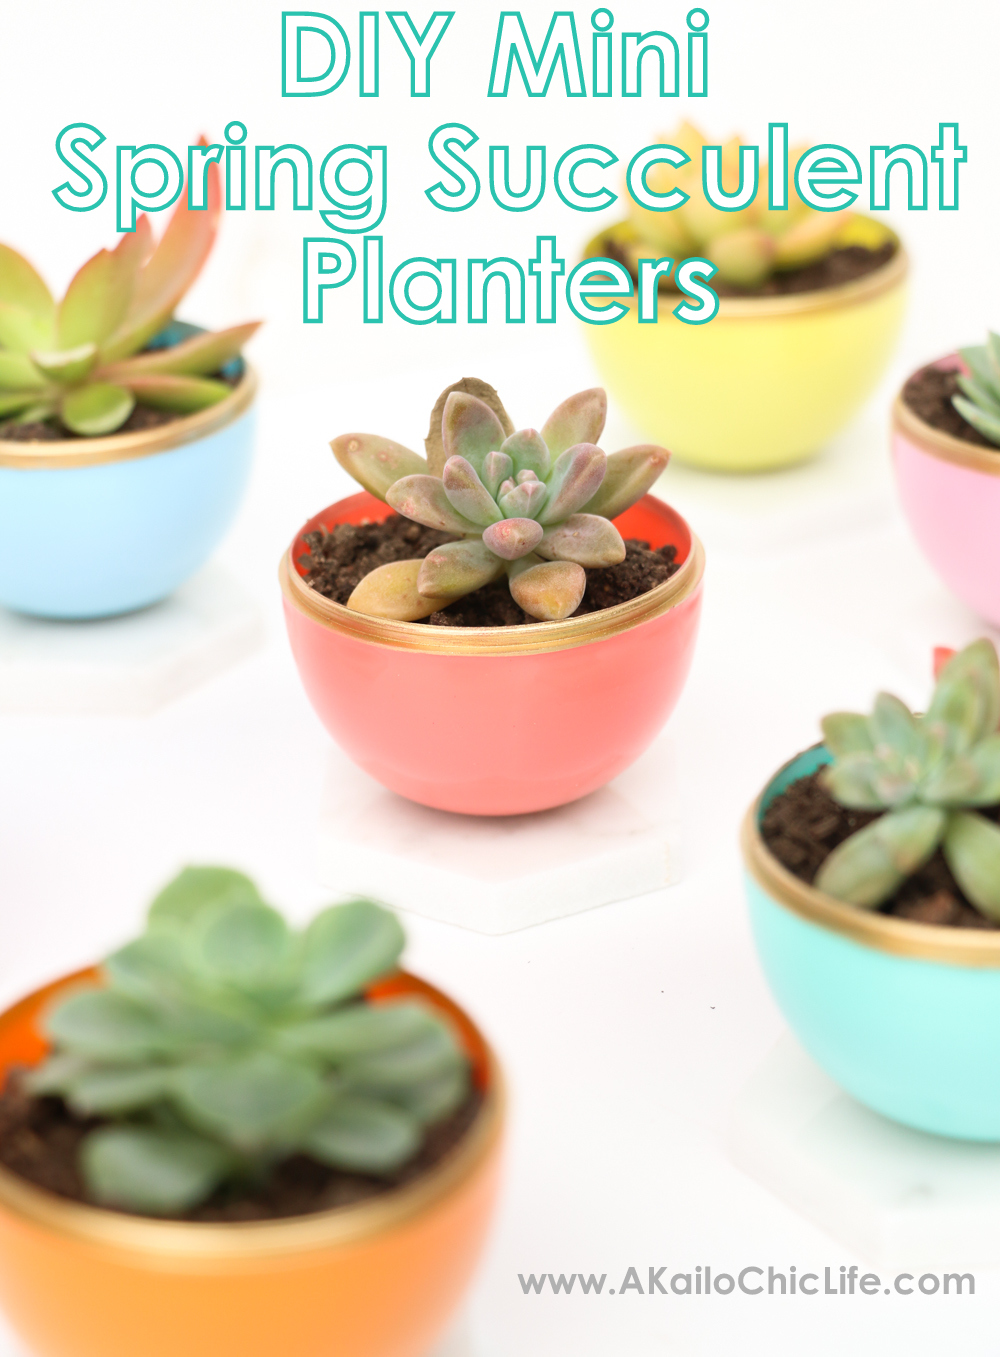


Okay, maybe I am too excited about this project. But I am so in love with how they turned out and that they were just so simple to make that really anyone could make them. It also doesn’t hurt that they incorporate some of my favorite things like gold, marble, and succulents.
These little planters would be perfect lined up on a shelf for decor, or as the centerpiece at your next dinner party, or even as little favors at a spring or summer bridal party. The possibilities are endless, and once you get started making them, I promise it will be difficult to stop.
Lets get started with the tutorial shall we?
The Supplies:
- Marble hexagon tile
- Colorful large plastic Easter eggs
- Gold Leaf Pen
- Hot Glue
- Assortment of Succulents and some potting soil
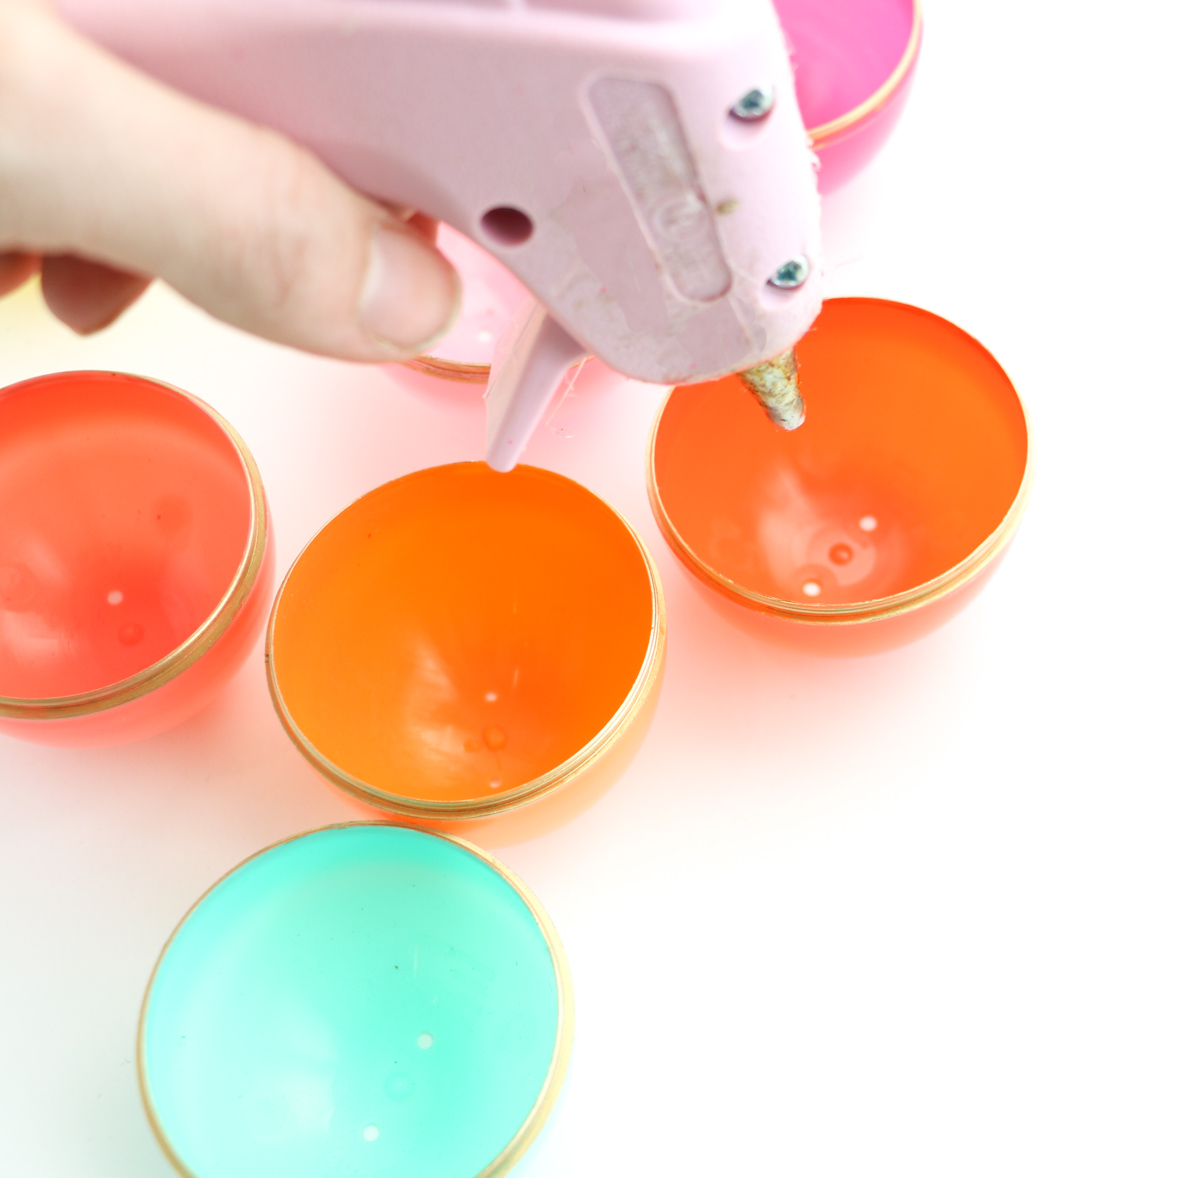
You will begin by opening the eggs and using the bottoms only. But save those tops because I have another project coming up next week for how to use those! You will also need to separate the marble hexagon tile from its backing mesh so that you have individual pieces to work with.
Now use your gold leaf pen to color the top edge of the bottom portion of the egg. There should be the inset section of the egg that you will want to paint gold. This helps disguise the fact that the little planters are made from plastic eggs and gives a nice gold accent to the planters.

Once your eggs have been accented with the gold, you will use your hot glue to fill in any holes in the bottom of the egg. Just a small dot of glue will work. Then use the hot glue to affix one egg bottom to one piece of the marble hexagon tile. And repeat with all your other eggs and tile pieces.

Now you have your mini planters all ready to be filled with potting soil and baby succulents! The great thing about succulents is that you can break off the shoots from one large succulent and replant them to make mini plants. As long as you keep the soil moist they will re-root and begin growing anew. If you follow me on Instagram you may have seen me hint at pulling succulent shoots from my succulent garden for this project a few weeks ago.
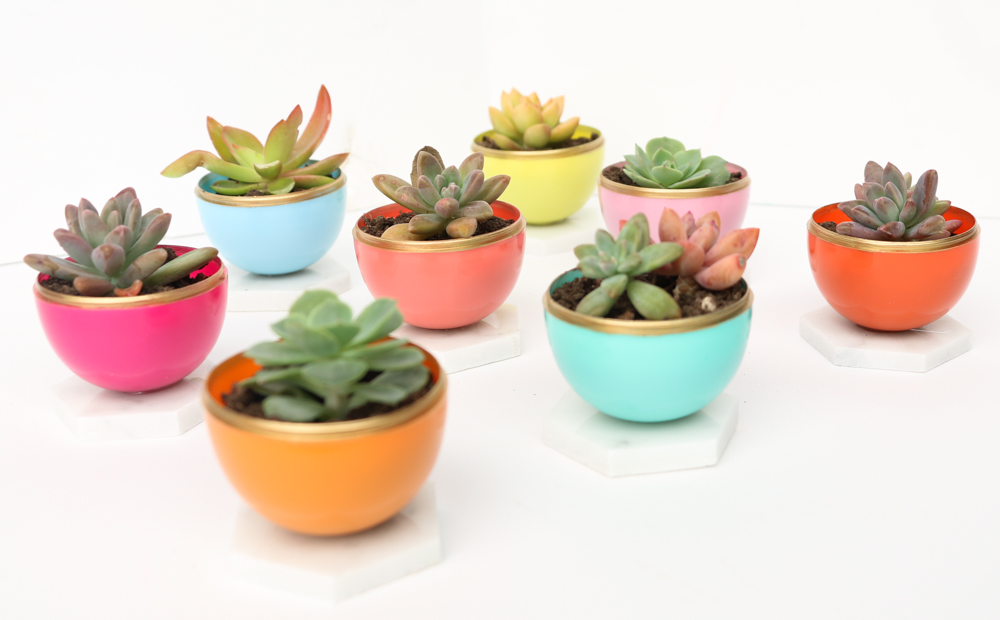


Now that your mini planters are filled, I don’t think that there is anyway someone would be able to tell that they started as plastic Easter eggs. Do you?


Have you had enough photos of them yet? Well, how about one more. Just for good measure!

Now go get your craft on and I will see you next week with even more awesome plastic Easter egg ideas for your spring table!

*Note: Some of the links in this post are affiliate links
which means that I get a percent of the sale if you were to happen to
purchase something that I link to. The price is the same for you either
way, but I get a little commission that helps me pay for more supplies
to make even more awesome blog posts for you!


March 4th, 2016 at 9:23 pm
How adorable!
March 4th, 2016 at 9:50 pm
Thanks! I may have taken a ton of pictures of them because I love them so much!
March 11th, 2016 at 2:59 pm
Really cute!! but how did you get the eggs to sit? aren't they round on the bottom? Also, you may want to leave the holes for drainage or add sand (1 part sand to 1 part soil) if you don't have drainage holes.
March 11th, 2016 at 3:04 pm
I hot glued the eggs to the marble tiles. That way they have a heavy, flat base to stand on. Good idea with the sand dirt mixture. I didn't want the holes because I didn't want the water leaking all over the table when I water them.
April 5th, 2016 at 9:49 pm
Okay – so I'm kinda sad that Easter is over because I am just loving all your cute egg ideas, lol!
July 12th, 2016 at 7:31 am
They plants are adorable!!!
October 17th, 2016 at 2:24 am
Where did you get the mini tiles??? I really want to make these, nut don't know where I could get them. Also, how much are they? I love these so much! Hope to make a ton soon!!! 🙂
October 17th, 2016 at 2:57 am
If you click on the words marble hexagon tile in the supplies lost it will take you to the Amazon listing where I bought the tiles I used. Right now they are less than $7 for a whole sheet of 20-30 tiles.
October 22nd, 2016 at 1:00 am
Is it expensive to make this?
February 28th, 2017 at 8:53 pm
I bought enough plants to make 7 total. (Granted there were more eggs & tiles purchased than needed). That being, I spent about $22.00 for all the supplies (not including the hot glue/gun, I had that).
2" plants – $1.59/each Local garden center
Foil Pen – $5.00 Hobby Lobby w/ coupon
Large eggs – $1.98 Walmart
Hexagon Tiles – One Sheet (25 tiles, mixed with small black tiles) $2.57 Home Depot.
Hope that helps! 🙂
February 28th, 2017 at 8:54 pm
Super Cute! Making these tonight with a girls youth group! Thanks for sharing!
March 5th, 2017 at 3:06 pm
Do you think the oil-based Sharpies would work as well as the foil pen? I want to make these with my Daisy Girl Scouts!
April 4th, 2017 at 8:24 am
Fantastic idea! They are so simple, yet colorful and fun! Love them! 🙂 Lisa
May 2nd, 2017 at 5:20 pm
The idea is wonderful. I'm going to use it for a primary grade school Mother's Day project. I think my second grade students would really enjoy making them and I have all the materials except the plants.
January 20th, 2018 at 1:49 am
[…] DIY Mini Spring Succulent from akailochiclife.com […]
March 4th, 2018 at 9:46 pm
[…] Make also colorful DIY succulent planters that will rock to welcome the spring season! You can also repurpose the plastic eggs to make some cool and colorful succulent planters for your space! Here the plastic egg succulent planters have been adorned with a gold paint line at the around the top and sits on hexagonal marble tiles for a graceful look and appeal! Another outstanding spring décor project to duplicate! Grab the full free guide and visual instructions from here akailochiclife […]
March 30th, 2018 at 1:31 am
[…] Source: A Kailo Chic Life […]
April 6th, 2018 at 8:29 am
[…] contamos también dos ideas con hueveras de colores que nos han enamorado. En la primera se trata de utilizarlas como jarrones para alegrar nuestro […]
April 20th, 2018 at 3:10 pm
[…] Mini Succulent Planters Succulents are such a wonder- beautiful and easy to keep alive. A Kailo Chic Life put together this fantastic DIY project that is great for the succulent lover! Again, these would […]
May 31st, 2018 at 3:23 am
Love it!!!Thank you
July 11th, 2018 at 1:56 pm
[…] Making the planters is easy and requires only a marble tile, colorful plastic Easter egg, gold leaf pen, hot glue and, of course, the succulents. Another great potential addition to your gift basket! […]
September 22nd, 2018 at 7:19 pm
[…] you believe me if I told you that these miniature planters are made from plastic Easter eggs? Well, it's true! This just goes to show that you can use […]
October 28th, 2018 at 7:07 pm
I love love them even though it’s almost Christmas I’m going to make some very merry ones lol thanks for the idea.
November 13th, 2018 at 7:19 pm
Omg, these are so darn cute! Thank you for sharing.
November 15th, 2018 at 3:48 pm
[…] Via A Kailo Chic Life […]
January 19th, 2019 at 1:21 pm
But why would you cover the holes that would give the excellent drainage Succulents need?
March 17th, 2019 at 10:23 am
[…] Tutorial: akailochiclife.com […]
April 5th, 2019 at 2:12 pm
Are these eggs the standard 3” egg or a jumbo 6” egg?
April 5th, 2019 at 2:14 pm
Are these standard sized eggs or the jumbo 6” eggs?
April 8th, 2019 at 3:29 pm
They are inbetween the regular small egg size and the super big. I would say that they are about 2.5″ in diameter.
April 30th, 2019 at 9:33 am
[…] Tutorial: akailochiclife […]
May 3rd, 2019 at 9:34 am
THIS IS AWSOME
May 15th, 2019 at 2:09 am
[…] Full tutorial at A Kailo Chic Life […]
May 21st, 2019 at 4:15 am
[…] you like this idea, click here to find out how to make […]
October 10th, 2019 at 8:50 pm
[…] A Kailo Chic Life mini succulent planters […]
November 17th, 2019 at 2:37 pm
I never would have guessed the planters were Easter eggs. The pastel-colored containers caught my eye. Very pretty.
February 23rd, 2020 at 9:12 am
What an incredible idea! I like this idea for my wedding give aways! Ty
March 1st, 2020 at 8:33 am
Keep them comin
March 11th, 2020 at 6:12 pm
[…] SOURCE: akailochiclife.com […]
March 27th, 2020 at 5:55 pm
[…] Mini Spring Succulent Planters at A Kailo Chic Life […]
April 12th, 2020 at 4:44 am
[…] Via Akailochiclife […]
April 19th, 2020 at 11:07 pm
[…] photo: A Kailo Chic Life […]
May 2nd, 2020 at 11:21 pm
[…] Don’t forget to use the hexagonal marble tiles for stylish placement of these succulent planters! Complete tutorial and instructions here akailochiclife […]
August 22nd, 2020 at 12:19 pm
[…] Tutorial […]
November 23rd, 2020 at 11:56 am
[…] anything in colors instantly wins our our hearts and praise for being so beautiful and charming. So here are these colorful succulent planters made out of the Easter eggs and made to stand on the hexagonal tiles. windows, mantles, shelves, side boards or tables they would make an eyeful appearance on each of these spots and instantly boosting up the decor. Grab the full tutorial here akailochiclife […]
January 7th, 2021 at 6:10 pm
[…] Mini Spring Succulent Planters – Succulent plants are very popular because they are so easy to take care of. These planters are a great item to sell to those plant lovers. […]
March 28th, 2021 at 11:40 am
[…] You can do awesome things like use them for this Easter-themed STEM activity from CraftGossip, make miniature succulent planters from A Kailo Chic Life, or make a wreath like this one from […]
April 5th, 2021 at 9:37 pm
[…] Planters […]
April 15th, 2021 at 3:03 pm
[…] Credit: akailochiclife.com […]
May 5th, 2021 at 5:25 am
[…] Credit: akailochiclife.com […]