


This past weekend I spent time organizing and going through my kids rooms and my craft room. My craft room had become so cluttered with supplies, and no where to put them, that it was starting to feel like it was closing in on me. And the mess put a damper on my creativity. I don’t know about you, but when there is chaos all around, it’s hard for my mind to think freely and creatively. So, now that they room much more organized and everything has a place, I find myself over come with ideas for making all the things like how to make a marbled clay planter.

All my clay is in one spot now, so it is easy to grab a few bricks and get to crafting. But this project only requires a few items, so even if you need to stop by the craft store first, this is a great quick project to try.
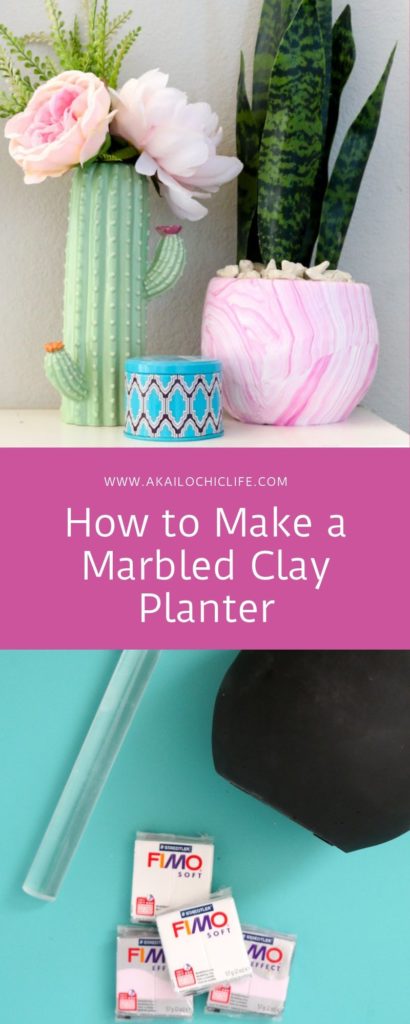
Materials for how to make a marbled clay planter:
- FIMO clay in rose quartz (or light pink) and white (2 packs of each)
- Acrylic rolling pin
- Ceramic or concrete planter
- Oven and baking sheet
- Plant, dirt, and rocks

Begin by working your two colors of clay until they are soft. Just roll, squeeze and squish them to soften the clay a bit. Then roll each color into a log shape.

Feel free to add a strip of darker pink clay if you wish, but this is optional. These colors will give you a pretty rose quartz mineral marble look. Then simply twist the colors together, fold in half and twist again. Then repeat 2-3 more times.

Once you get the clay nice and marbled. Roll the clay into a ball and roll it out with the rolling pin to get a large surface that is about 1/8-1/4″ thick and that will cover your planter.


Once rolled out, lift the clay and place it around your planter and use your fingers and rolling pin to join the clay together and roll over and seams. Then use an X-acto knife to cut off any extra clay on the top lip of the planter.

Place the planter on a baking sheet and place in a cold oven. Heat the oven to 275F and bake for 15 minutes. Then turn off the oven and let the planter cool in the oven. Remove and add your dirt, plants and rocks.

I was going for a more natural gem/mineral look with my marbling, but you can swap out the colors of the clay to create your own look. Try green and black for a malachite look, or purple, white, and black for an amythyst color marbled clay planter.


July 12th, 2018 at 6:56 pm
I have the fimo clay at home! So trying this and putting on the blog too 😉 LOVE your style and blog 😉
July 12th, 2018 at 9:15 pm
Thanks Ursula! The feeling is mutual. I love all your crafts!
July 19th, 2018 at 6:59 am
I am a dreamer at this point in my life. I have found a new pain med that has me active and energetic again. I love to check out DIY stuff but I am low on cash to buy even clay or planter. Getting there! Will save this for when I can!! Thanks. Can’t wait!