


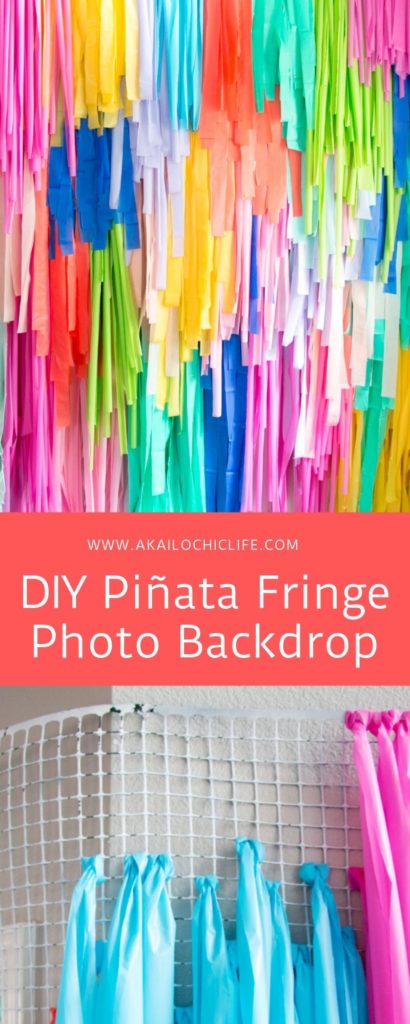
Have you all seen those fun, colorful fringed party decorations? The ones that look like a pinata wall? They seem to be popping up on my radar everywhere. I just had to try making one myself. Since I just celebrated my 35th birthday this past weekend, I figured why not try to make a DIY pinata fringe photo backdrop for my birthday? Surprisingly it isn’t difficult to do, you just need plastic table cloths and a piece of plastic fencing. Now, I won’t lie, it will take quite a few man hours to put together, but the time it takes will vary depending on the size you want.


Materials to make a fringe photo backdrop wall:
–Plastic table cloths
–Plastic fencing
-Scissors
Begin by cutting your table cloths into strips. You will want some long strips (about 8′ long), some medium strips (about 6′ long), and some short strips (about 4′ long) in each color you use. I found that it is easiest to unroll the length of table cloth that I need and cut it from the roll, then fold up the table cloth and cut into strips.

Once you have all your strips, you are ready to make your wall. I hung up the fencing on the wall using thumb tacks to make the process easier, but you can do all this on the ground too.
Creating a fringe photo backdrop
Start my folding one of the long strips of table cloth in half and threading the folded end through one of the bottom holes of the fencing to create a loop. Then pull the ends of the table cloth through the loop to make a cow hitch knot. Repeat to make a section of long table cloth pieces at the bottom. Then move on up to the middle of the fencing and add the medium length strips. Then at the top add the short strips to the very top row. Feel free to vary the location of the strips a bit to get different levels of fringe.


Keep working on the sections starting at the bottom and working your way up until you have your entire piece of fencing covered. Then you can hang the DIY pinata fringe photo backdrop up for your party guests to pose in front of! This section that I made is about 8′ tall by about 7′ wide and took two days to make. If that seems daunting, just enlist the help of a few friends and you can whip one out in no time!
Now that makes for one colorful party!
If you are looking for a quicker and easier way to make a fringe backdrop, be sure to check out our metallic mylar fringe photo backdrop tutorial too!


August 14th, 2018 at 11:00 am
I’d love to see a picture of the back!
August 14th, 2018 at 11:29 am
This piñata fringe backdrop is so beautiful! It’s crazy to think you DIY’ed it. I definitely want to try making this as a photo backdrop for a party some time in the future! 💕
August 14th, 2018 at 1:45 pm
This. Is. AMAZING. I would make it then leave it up for… well, let’s be honest, I’d leave it up forever! And since it’s made of plastic that would be totally do-able! You’ve inspired me, and now my little gears are turning haha.
August 20th, 2018 at 2:03 pm
This is so cute! I love how the idea can be used with any color scheme. What a great idea. Thanks for sharing.
August 24th, 2018 at 6:00 am
[…] poppet weaving-inspired sugar cookies -a beautiful mess easy crochet apple -repeat crafter me pinata fringe photo backdrop (a.k.a. latch hooking with unusual materials) -a kailo chic life macrame purse -fall for diy […]
August 29th, 2018 at 1:33 am
Wow! I love this idea! Thank you for sharing!
September 25th, 2018 at 5:03 am
[…] This Pinata Fringe Backdrop from A Kailo Chic Life […]
October 27th, 2018 at 10:30 pm
Love this! Looks like you spray painted the fencing white. When I sprayed certain plastics it leaves them sticky – is there a specific brand or type of spray paint you use?
October 30th, 2018 at 11:30 pm
Just make sure to use one that says it can be used on plastics on the can. Then it won’t be tacky.
October 28th, 2018 at 7:38 pm
Love love love this! How many feet of tablecloth would you estimate you used?
October 30th, 2018 at 11:26 pm
I honestly have no idea, but I can tell you I used about a half a roll of each color.
November 4th, 2018 at 2:30 pm
How would you transport this? I love the idea but I have no clue how I would move it around
January 21st, 2019 at 6:26 pm
Sorry! I’m just now seeing this comment! I just folded the fringe backdrop over until it was about 3-4′ wide and put it in the back of my SUV. Then I gently folded in the long hanging pieces. pretty simple since it is all just thin plastic.
January 21st, 2019 at 10:22 pm
Love this!!
How do you attach it to the wall? Is it just held by tacks was it fairly heavy to transport… want to make one but incorporate some bling like metallics. Do you think that would work?
January 22nd, 2019 at 8:24 pm
I just held it up with tacks, but nails work too. It’s not too heavy. Maybe 20 pounds or so. I think metallic fringe would be amazing!
January 23rd, 2019 at 10:30 am
How many tacks did you use to hold it up? I will be transporting it and since the wall i’d be using is all closets i can only put tacks on the top. Will that work? Also does dollar store plastic sheets work?
January 23rd, 2019 at 11:50 am
You can also use removable adhesive strips to hang plastic hooks on the closet doors. Like the 3M wall hooks. I would say at least 3-5 hooks. And yes, dollar store plastic table cloths would work too!
March 4th, 2019 at 7:51 am
Hi, to achieve the size of backdrop you made, do I buy one 2×25 feet plastic fencing?
March 4th, 2019 at 11:04 am
Yes!
March 12th, 2019 at 7:17 am
Hi,
Love this! Where did you buy all the coloured plastic rolls from please?
March 13th, 2019 at 9:10 pm
I bought mine on amazon, party city, and oriental trading
April 16th, 2019 at 2:56 pm
Hey! I love this idea so much. Do you know how many rolls of table cloth you used ?
April 22nd, 2019 at 1:37 pm
For an 8′ by 8′ backdrop, you need roughly 4 full rolls total. Divide that by the number of colors that you are using to see how much of each roll you will need.
April 22nd, 2019 at 1:13 pm
[…] DIY Piñata Fringe Photo Backdrop: I love me a good photo booth and a beautiful backdrop makes all the difference when we are talking about DIY Mexican party decorations. This piñata fringe is everything and can be built with just a few supplies: plastic tablecloths in alllll the colors, plastic fencing, and scissors. It’ll take a couple hours if you want a large backdrop, but can be used post-party for a festive wall hanging in a kid’s room, home office, or play room. I am all about repurposing craft projects here, people! Set out some sombreros, maracas, and cutout mustaches to go alongside the piñata fringe backdrop to complete the photo op. […]
April 30th, 2019 at 11:19 am
[…] DIY photo backdrop idea by A Kailo Chic Life […]
April 30th, 2019 at 1:36 pm
What size what that fringe backdrop? And how many rolls did it take to fill it up?
April 30th, 2019 at 2:02 pm
The fringe backdrop was 12’ by 10’ and I used about 1/2 of each colored roll.
June 9th, 2019 at 11:29 am
Where do you buy plastic fencing?
June 15th, 2019 at 8:34 am
I found it at Home Depot.
June 13th, 2019 at 8:32 am
Hi! Love your project and thanks for the instructions on how to!!
Did you ziptie the fence pieces together? I won’t be able to tack it the wall of the venue so I’m trying to come up with an alternate to hang this. Maybe tall pallets would work
June 15th, 2019 at 8:32 am
I just used one large piece the length I needed so I didn’t have to zip tie the pieces together. You can always try buying a photo backdrop frame used to hang step and repeats. Then just zip tie the fencing to the backdrop stand.
July 5th, 2019 at 11:16 pm
Your color selection is beautiful! How wide did you cut your strips?
July 9th, 2019 at 8:18 pm
Thank you! I cut them approximately 2″ wide.
November 6th, 2019 at 4:23 pm
Hii!! I LOVE THIS!! I read that you only used one fence strip of your length. How did you manage to get so many layers to achieve 10ft height when you only have 2ft on width of fence?
November 7th, 2019 at 8:55 am
The bottom layers attached to the fence are just really long. There isn’t actually fencing behind the whole fringe piece.
December 10th, 2019 at 3:02 am
[…] queen of colour Kalio Chic shows you how to make this crazy backdrop that’ll be perfect for taking photos in front […]
December 19th, 2019 at 11:11 am
[…] I borrowed the whitewashed barn from my friend and photographer, Paige Beitler. Then I used strips of plastic tablecloths from Arne’s (local party store) to create a colorful photo opp! If you’re interested in the DIY streamer backdrop, here’s a helpful tutorial! […]
December 30th, 2019 at 3:00 pm
Is it possible for you to make this for my daughter’s Troll Birthday Party. It would be a photo backdrop. I would need by the January 22, 2020?
I look forwqrd to hearing from you soon.
December 30th, 2019 at 3:41 pm
Hi, quick question. Is it possible to have you make this photo backdrop for my daughter’s upcoming Troll Birthday Party. I would need it by January 21, 2020. Thank you!!.. Is the one you pictured here available? THOSE are the exact colors I need, lol!!
Best,
Annette
January 9th, 2020 at 8:39 am
Unfortunately I can’t make one for your party. But you could check with local balloon and party shops to see if they can recreate the look for you.
December 30th, 2019 at 11:19 pm
[…] 21. How to Make a Pinata Fringe Photo Backdrop […]
December 31st, 2019 at 5:01 am
[…] 21. How to Make a Pinata Fringe Photo Backdrop […]
January 17th, 2020 at 12:09 pm
[…] 21. How to Make a Pinata Fringe Photo Backdrop […]
January 27th, 2020 at 2:12 pm
Where did you purchase that white fence? The one you tagged is green and I need white because I am going to do it up against a white wall and I do not want any green to show. Can you please let me know which one is in your photo?
January 31st, 2020 at 9:30 am
I spray painted the green fencing white. But realized afterward it didn’t matter becuase none of the fencing shows through once the table cloths are on the fencing.
February 5th, 2020 at 2:31 pm
How did u do the knotting again
I can seem to figure it out
February 6th, 2020 at 10:16 am
It is called a cow hitch knot if you want to look up more detailed instructions.
March 29th, 2020 at 12:06 am
[…] Credit: Rainbow Cake // Pastel Balloons // Pinata Fringe // Pastel Donuts // Rock Candy // Party Hats // Tassels // Hey Sunday // Party […]
May 18th, 2020 at 12:15 am
Hi there!
This post is great and really helpful! What did you use for your fencing and what did you use to hold it up?!
Best,
Brie
May 21st, 2020 at 8:11 am
I used thumbtacks in the wall to hang it up. As for fencing, I linked to the one I used, but if that is sold out I just used a square holed plastic fencing that you can find at any hardware store.
June 15th, 2020 at 11:30 am
I’m wanting to make one to use as a fence outside. Do you think this could withstand the weather? An ideas on making it outside sturdy? This is beautiful and just the splash of color my garden/daughter’s play area needs. Beautiful idea!!!
Thank you, Kimberly R
June 29th, 2020 at 8:45 pm
It is plastic, so it should hold up for a while, but I am sure the sun and snow will eventually wear it down. So I would say it likely won’t last more than a season outdoors.
September 8th, 2020 at 2:02 pm
[…] 2. Fringe Photo Backdrop […]
October 19th, 2020 at 2:44 pm
This is amazing! How long do you think this took you to complete?
January 22nd, 2021 at 9:56 am
With the help of my assistant it took us about a week to make this large of one.
January 10th, 2021 at 11:40 am
[…] Every party needs a setting. Made from plastic table cloths, how creative and unique is this colorful party backdrop? Recreate this Piñata Fridge DIY Photo Backdrop for an art party. Just add some art accessories like these Bob Ross Photo Booth Props. Those would be a hit!| A Kailo Chic Life […]
March 14th, 2021 at 11:51 am
How many plastic tablecloths did you end up using for this project!
March 24th, 2021 at 8:26 am
I used one roll of each color.