


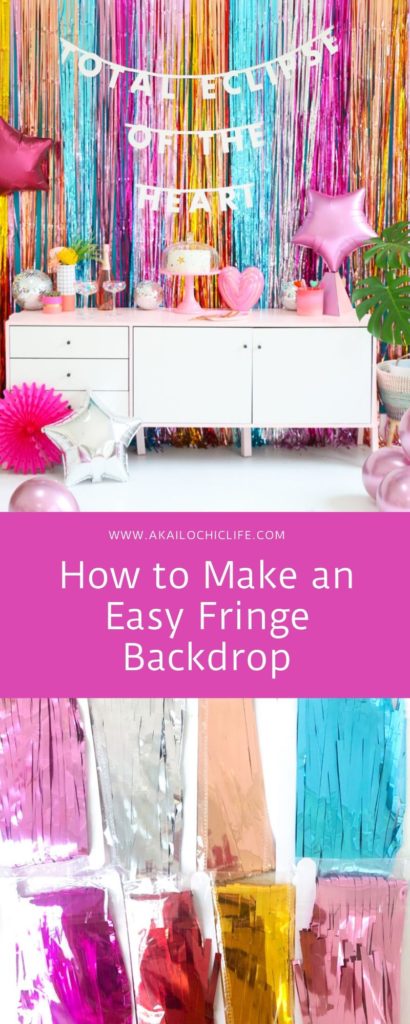
It really shouldn’t have come as a surprise how popular my DIY piñata fringe backdrop post was, it’s so fun. But you can’t seem to get enough of it! The process, however, can be a bit time consuming. That’s why I wanted to share a different way to make an easy fringe backdrop for your next party. And this one won’t take you a week to make! In fact, this metallic fringe backdrop will take less than 30 minutes to put together. Bonus: it has just as much pizzazz as the piñata fringe photo backdrop!

Since it is almost Valentine’s Day, I went with a colorful 80’s themed Valentine’s party with this backdrop. But you can adjust the colors you use to fit your party theme. It wasn’t until I started planning out this backdrop that I realized how many different colored metallic fringe streamers are available. With the options you could easily do silver and gold, or all blues, greens, and silver for an under the sea party, or all pink and red for a full on tradtional valentine’s party. The color combos are endless.


I of course went with rainbow fringe for a totally colorful fringe party backdrop.
Materials to make your own easy fringe backdrop:
- Metallic fringe in your choice of colors (I used aquamarine, fuchsia, baby pink, rose gold, silver, red, and gold for my backdrop)
- Scissors
- Thumbtacks (optional)


Begin by opening the fringe curtain packages. I found the best way to get the multi colored layered look is to cut the fringe curtains into 8″ sections, then I simply peeled off the backing strip to reveal the adhesive and stuck this to the wall. Then I continued alternating colors to create the first layer of the backdrop. Next, I started on a second row that was a half step over from the first row and attached the fringe about 6″ higher than the first row. Repeat this all the way across the wall. The final step was to repeat with a 3rd row 6″ above the 2nd and again a half step over.

This alternating of colors and rows helped to create the multi color layered fringe look.

The fringe backdrop looks super behind a dessert table or even as a photo backdrop. And as you can see it is as easy as cutting the fringe sheets into strips and layering them on the wall.
Such a glittery and show stopping look for not much work! Just how I like it!


March 6th, 2020 at 12:28 am
How many packs of fringe curtains did it require to make this back drop?
March 10th, 2020 at 8:36 am
I used one fringe curtain in each color. So around 8.
March 10th, 2020 at 9:50 am
I love this multicolor fringe – way better than all gold or silver! Keeping this in mind for my next birthday party. 🙂
March 11th, 2020 at 9:10 am
Right?! I love the look of all the colors together!
January 4th, 2021 at 5:02 pm
How wide was your banner at the end? ❤️
January 22nd, 2021 at 9:40 am
Around 12′ wide.
January 26th, 2021 at 3:33 pm
How does The top Of the backdrop look? Wasnt quite sure how you went over in the below steps.
second row that was a half step over from the first row and attached the fringe about 6″ higher than the first row. Repeat this all the way across the wall. The final step was to repeat with a 3rd row 6″ above the 2nd and again a half step over.
Thanks looks amazing want to duplicate for VDay! ❤️💖🥰
February 9th, 2021 at 8:45 am
The top is just the top uncut portion of the curtains where the adhesive back is.
February 13th, 2021 at 9:29 pm
how can you make this backdrop and reuse it again? can you super glue or hot glue the fringe to a queen sheet? I would want to reuse it and not attach it directly to the wall.
February 24th, 2021 at 7:38 am
It easily peels off the wall, then you can fold it and wrap it around a piece of carboard to store it for use again.
May 5th, 2021 at 5:09 pm
Hi!! I love this! Is each layer of fringe in a row with no spaces in between going horizontally? Are they all stuck side by side going horizontally? I hope that makes sense.
May 22nd, 2021 at 9:48 am
They aren’t I spread them out to every three spaces to take up less time and material. But it still looks full and you can’t see any gaps because of the over lapping of higher layers. The top layer I did one in every spot on that row for a finished look.
April 25th, 2024 at 12:33 pm
Loving this. Going to try and make for my daughter’s birthday party! Two questions – what is the importance of having multiple heights? I get the overlap but not sure what the gain is there?
Also is there red in there? It’s not mentioned in the colours used but it is in the pictures and I’d really like to replicate! Thank you 🙂