


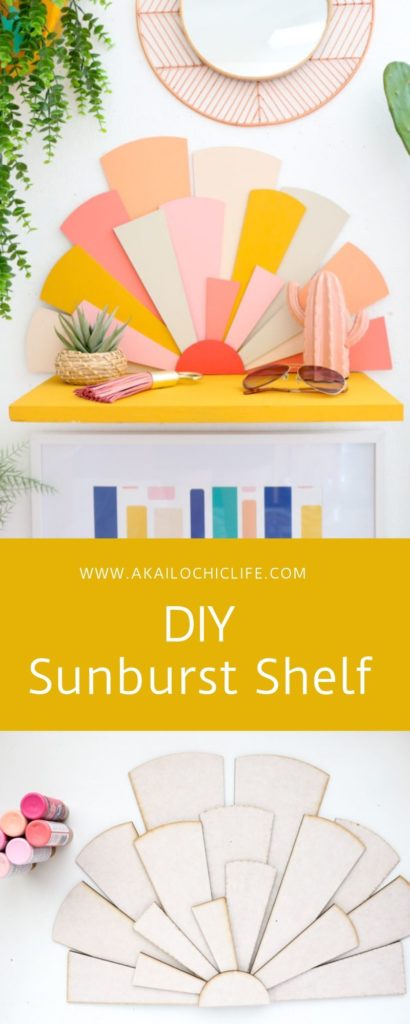
Sometimes you scroll through Instagram and mindlessly double tap the photos that you see and sometimes you scroll and find the most inspirational image that instantly makes the creative juices start flowing. That’s what happened to me when I saw this giant wood photo back drop on Instagram from Jesi Haack Design a month or so ago. I immediately fell in love with the colors and look of it and knew I needed to translate it into something I could have in my home. So I got designing and created a small version that I turned into a shelf! Find out how I created this DIY sunburst shelf with the Glowforge laser cutter below.


I used my Glowforge (my favorite crafting machine ever!) to cut out the sunburst pieces and then painted them, glued them together and used them as the back of a simply floating wood shelf. If this doesn’t give you all the desert summer vibes, I don’t know what will!
Materials to make your own DIY sunburst shelf with the Glowforge:
- 3 – 1/8″ , 12″ by 20″ MDF wood sheets
- Glowforge laser cutter
- Acrylic craft paint in shades of yellow, coral, pink, and cream
- Wood glue
- 10″ deep floating wood shelf (I used just a scrap piece of wood cut to size plus two 6″ L-brackets)
- Adhesive mounting strips
- These three cut files 1, 2, 3
Instructions
If you own a Glowforge, you can use the three files above to upload into the Glowforge app. Then simply cut the shapes using the preset settings for MDF sheets. If you don’t have a Glowforge, you can print out the templates to scale and trace them on a piece of MDF then use a scroll saw or jig saw to cut out the shapes. They are fairly simple, so while it will take longer than using the Glowforge, you can still create the same look without one.

Once you have the wood cut, peel away the paper backing if using the Glowforge MDF sheets and paint the pieces with your acrylic craft paint.

Next, use the wood glue to layer and glue the pieces to each other. Warning, these don’t all fit flush together perfectly, but you should be able to layer and glue the overlapping pieces to each other to create a unique sunburst look. The last piece will be the half circle “sun”.

Once the pieces are together and the glue has dried overnight, it’s time to put up your shelf. You can either use a painted floating shelf from IKEA or Target, or you can use a piece of cut lumbar like I did. I just cut a 10″ piece of lumbar to size to fit the sunburst and screwed on two L-brackets underneath the shelf.


Next, I mounted the shelf on the wall by screwing the l-brackets to the wall using mollies. Then I used mounting strips to adhere the sunburst to the l-brackets and wall at the back of the shelf. Simple!
The Results


Like I mentioned above, this project is totally doable with just a scroll saw too, but the Glowforge makes the whole process so much more precise and less time consuming. Especially since I have the design files for you above. If you haven’t checked out the Glowforge yet, go do it and then come back here and see all the fun and colorful projects I have made with it! While I love it to craft with, it is also great for small business looking to create unique laser cut products to sell.


May 29th, 2019 at 4:42 am
[…] Source link […]
June 6th, 2019 at 12:36 am
[…] -Read More – […]