


Did you see the clay ball cheese knives I made last week here on the blog? Well, after making them I had a bit of clay leftover and had the idea to try covering the handle of a few gold forks I had laying on my work table from a previous photoshoot. And you know what?! It worked and made the cutest patterned forks ever! Follow along with my tutorial below to learn how to make patterned forks with clay for yourself.


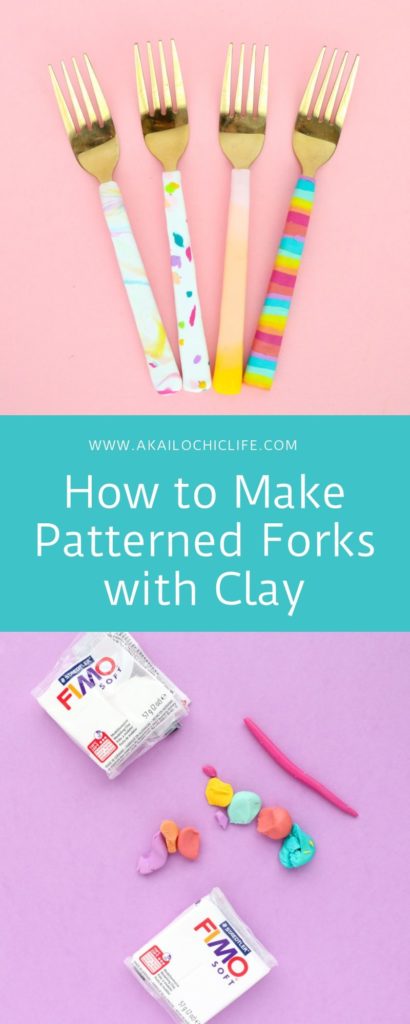
Are you not dying right now over their beauty?! I couldn’t decide on one pattern for all the forks, so I went with the more is more mantra and made each fork have a different pattern. We have confetti, marble, rainbow stripe, and ombre and I love them all equally! You can make your own patterns too, maybe abstract or black and white marble? There are so many ways to give your silverware a little pattern upgrade.
Materials to make your own patterned forks with clay:
- FIMO polymer clay
- Silverware (I love these gold forks from Walmart)
- Clay rolling pin
- Oven and baking sheet
- x-acto knife
- polymer clay sealant

Begin by deciding on your pattern. For the confetti pattern I used a rolled out base of white clay and added small pieces of colored clay on top. Then I rolled over the colored clay to press it into the white clay.
For the marble, I used a log of white clay and then thin logs of colored clay and twisted the clay together several times to create the marbled swirl. Then rolled it out flat.
For the ombre I laid out the three colors of clay in a flattened ball shape next to each other and rolled over the clay with the rolling pin to press the clay colors into each other and started to create the ombre look. Then I folded the clay back on iteself and rolled it out again to really blend the colors.
For the rainbow, I created logs of each color and placed then next to each other. Then I cut down the logs and laid them all out in a long repeating rainbow pattern and rolled over the logs of clay with the rolling pin to flatten the clay and create a rainbow stripe.


Once you have your flattened piece of patterned clay, it is time to wrap your fork handles. To do this cut the clay down to a rectangle slightly longer than the fork handle and about twice as wide. Then lay your fork on the clay with the back side facing up. Fold the clay over the handle and use a utility knife to cut away the excess clay down the middle of the back of the fork.
Use a rolling pin to smooth the clay on the back of the fork and seal up the seam. Use your fingers to smooth out the clay and press the ends tight along the neck of the fork as well as on the bottom of the fork. You don’t want pockets where water can get in when washing the forks.

Once you have your fork handle covered with the patterned clay, repeat with your other silverware. Then lay them all out on a baking sheet and bake at 230F for 15 minutes. Let cool and then give them a coat of clay sealant to keep the moisture out of the clay.


As you can see, the first fork I made was the rainbow stripe and I didn’t roll over the seam well so it is still visable. But I got better as I went along!
I love how these patterned clay forks turned out! It makes them so pretty and fancy looking, don’t you think?!


May 30th, 2019 at 2:31 pm
These are cute! As are the cheese knives. How do you clean them? Can they go in the dishwasher? Will the clay fall off the fork if washed with soap and water?
June 3rd, 2019 at 9:01 am
Hi!
You can actually just wash them with soap and water without a problem. The clay gets baked and cured in the oven and becomes a sturdy plastic polymer that won’t crumble or break unless to really try to break it by hitting it with a hammer or chisel. I wouldn’t recommend putting them in the dishwasher simply because I am not sure how they would hold up, but regular handwashing works well. You can always try a dishwasher experiment with one to see how it goes.
December 17th, 2019 at 12:18 pm
[…] to Make a Number Cake + My BlogiversaryImage Source: 13. Dried & Faux Floral Arrangements 14. PATTERNED FORKS 15. DIY tropical paper leaf table runner 16. DIY Mini Crown Party Hats TAGS:diy party […]