


It always seems to take me a bit to come around to trends, but I am definitely on board with the caned look. Obviously I am all for the DIY over buy method if I can help it. Especially since the caned pieces are pricey and a few in options. So I thought I would give my much loved credenza in the studio a little caned makeover. Last year I painted it pink, and now with the caning, it looks so completely different. I just have to figure out new hardware for my DIY caned credenza with paper cane.

Isn’t it pretty?! And here it is before:

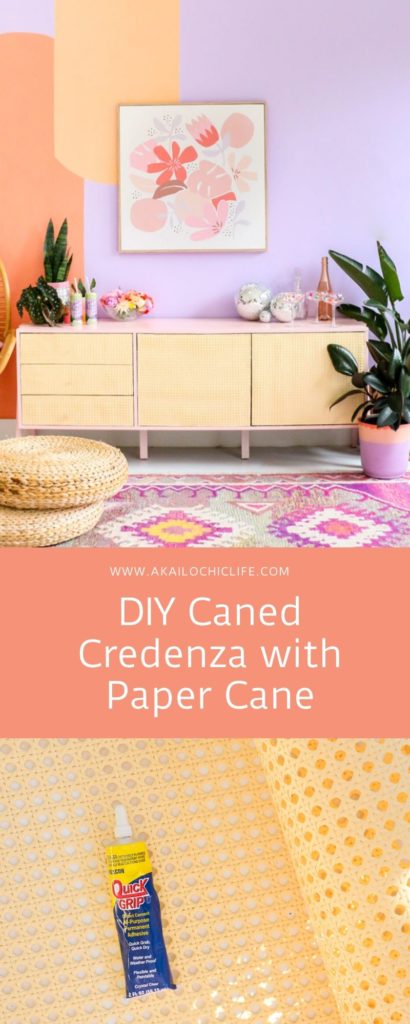
Definitely an upgrade if you ask me!
Now, I am sure at this point you are asking what is paper cane and how is it different from real caning? Well paper cane is just that, paper. It looks just like the real deal wood caning, but is easier to work with for craft projects like this one. Plus it is much cheaper! The only downfall of paper cane is that it is not sturdy enough for chair projects. So you don’t want to use it for any projects that will put weight on the caning, because it is paper after all and will rip.
Materials to make a DIY caned credenza with paper cane:
- Credenza (This is the one I have)
- Paper caning (You will want to measure your credenza and figure out how much yardage you will need. I used 6′ of this 24″ wide caning for this unit)
- Quick grip glue
- Clamps
- Scissors

Begin by measuring each of your drawers and door fronts. Then cut out the paper cane into those size pieces.

Next, use the glue to add small beads of glue to the paper caning along the edges and across the solid strips. Then place on your door or drawer front.
Next, use the clamps to hold the paper cane in place until the glue has time to set up a bit (about 10 minutes). Then you can remove the clamps and move onto the next drawer or door. Repeat this process until all the surfaces are covered with the paper cane.

Once the glue is dry, you can use a sharp utility knife or a pair of scissors to cut off any extra caning sticking out past the drawer front. If you are really on it, you can even cut some thin 1/4″ wood trim to glue around the edge to finish off each drawer and door more professionally.
The final step is to add the hardware. Which I haven’t done yet, because I can’t figure out what I want exactly. So if you have any ideas for hardware, let me know!
I love the warmth the paper cane gives to the credenza! And it goes perfectly with my new painted wall in the studio.
Have you made any projects with caning?


January 8th, 2021 at 4:42 am
Hi!!
How do you do this painting on the wall?
January 22nd, 2021 at 9:39 am
HI!
I just taped off sections and painted them, then free handed the curves.
January 29th, 2021 at 7:32 pm
[…] DIY Caned Credenza by A Kailo Chic Life: photo via A Kailo Chic Life […]
February 24th, 2021 at 7:16 am
I love your rug here! I am wondering if you have a link to it?
February 24th, 2021 at 7:36 am
Yes! You can find it here: https://www.rugsusa.com/rugsusa/rugs/rugs-usa-moroccan-diamond-pole/Pink/200GYBD03A-P.html