


When we were building the Kailo Chic studio, I was trying to save costs wherever possible. So for the bathroom we used an IKEA vanity that had been in our garage for years waiting for a guest bathroom makeover that never came.
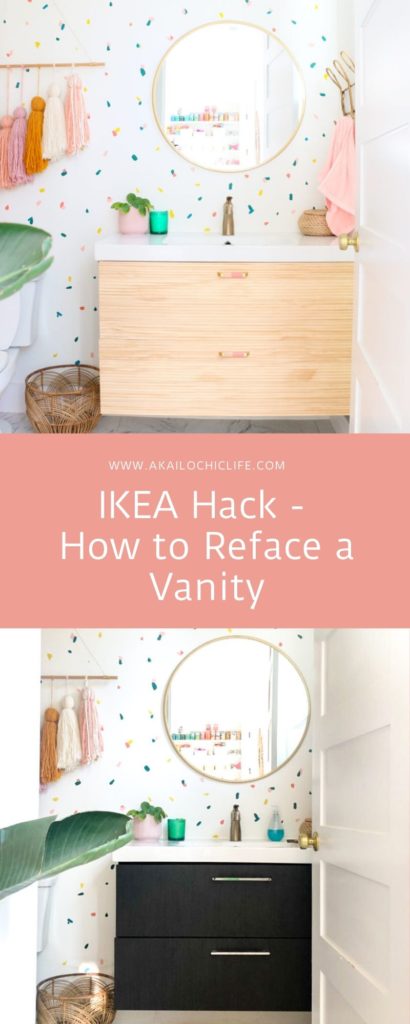
It was the perfect size for the studio bathroom, so we used it. However the black drawers and silver hardware weren’t really the look I wanted in the space.
I wanted light and warmer tones.
So I took a cue from Cyn of Hot Pink Pineapples and decided to reface the vanity with pine trim. This project was so simple and only required 8 cuts, a little liquid nails, and some finishing nails.
The refaced IKEA vanity is now perfect for the space!


Materials needed to reface a vanity:
- Wood trim boards (I found these at Home Depot)
- Liquid nails panneling adhesive
- Finishing nails
- Wood filler
- Hardware
- Miter saw
- Clamps


How to Reface a Vanity
The first step was to measure the length of the drawers and then mark the measurements on the trim boards. Next, I used the miter saw to straight cut the wood trim boards to the marked length. I used three of the wider trim boards and one of the smaller trim boards to fit the drawer fronts.

Once the wood pieces were cut, I squeezed the liquid nails onto the backs of the trim boards and pressed them onto the vanity front.
Then used the clamps to secure the boards in place while the adhesive dried overnight. At this time you can also add a few finishing nails throught the boards about 1″ in from the sides to secure them a bit more once the clamps come off.

After 24 hours, the clamps were removed and new holes were drilled for the hardware. I will be sharing the tutorial for the DIY hardware later this week so you can recreate the look!

The final step was to fill all the gaps between the trim boards and the nail holes with natural color wood filler.
Then the drawers were put back on the front of the Ikea vanity.
If you are asking yourself if the side of the vanity is still black, the answer is yes, but I plan to paint in a cream color to match the wood on the front. However, you can repeat this process for the side of the vanity as well, you just might want to trim the boards on the front drawers a bit longer so that they cover the ends of the wood on the side of the vanity and give a clean look to the front of the vanity.

I love how the wood instantly warms up the space! And if I choose to in the future I can always paint it a fun color, but for now, the warm tones are perfection!
For more bathroom makeover ideas, check out the before and afters of these two bathrooms I designed on non existent budget for the FOMO factory.


February 7th, 2020 at 2:04 pm
where is that wallpaper from??!!
February 10th, 2020 at 8:51 am
It’s not actually wallpaper! I hand painted the pattern with small foam craft brushes. I will try to write up the tutorial this week!
February 17th, 2020 at 1:04 am
[…] akailochiclife.com […]
April 12th, 2021 at 10:29 am
I LOVE this look. Can you please tell me where you got the gold loop towel holder I have looked everywhere online! It would be perfect in my girls small and awkward bath space. Thanks for sharing!!!